After logging into your SiteRecon account, you’ll land on the ‘My Properties’ page- the central hub for managing all your sites. It begins with the ‘My Properties’ header and looks like this:
The property dashboard is divided into three main categories and includes multiple filtering options, making it easier and faster to find and manage your properties.
1. Property Categories
The property list is organized into three categories to help you quickly locate the sites you're working on.
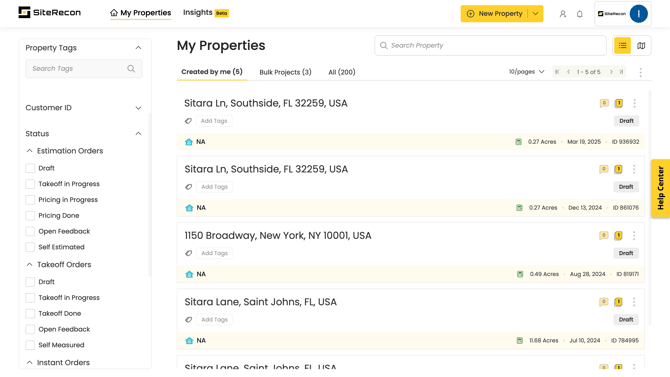
1.1 Created by Me
This section displays all the properties you’ve personally created. Each row shows the current status of the property, such as Approved, Draft, or In Progress. You can click on any property to open it in a new tab on the map screen for detailed viewing and editing.
.png?width=670&height=378&name=Untitled%20design%20(3).png)
1.2 Bulk Projects
Click on the Bulk Projects tab to view a list of all bulk orders placed.
- Select a project to see its details, including total property count and approval status.
- Scroll down to view the list of individual properties included in the bulk order.
- To update project details, click the Edit Description (blue button) and modify the title or description as needed.
- Use the back arrow to return to the main bulk project list.
.png?width=670&height=378&name=Untitled%20design%20(4).png)
1.3 All
This section displays all properties accessible to you, whether or not you created them.
You can click on any property in this list to open it on the map screen in a new tab for viewing or further action, depending on your access level.
.png?width=670&height=378&name=Untitled%20design%20(5).png)
2. Switch Pages
The property dashboard lets you control how many properties are displayed per page. You can select from 10, 20, 50, or 100 entries using the dropdown menu, as shown in the screenshot below.
To navigate between pages, use the arrow controls:
- Click the right or left arrows to move to the next or previous page.
- Click the double arrows on either end to jump directly to the first or last page of the list.
These controls work consistently across all three property categories.
.png?width=670&height=378&name=Untitled%20design%20(6).png)
3. Filters
Filters help you quickly narrow down your property list based on specific criteria. You can apply one or more filters at a time to efficiently find the information you need.
Use the filtering options available in the leftmost column of the dashboard.
The Created by Me and All categories share the same set of filters, while Bulk Projects have a different set tailored to project-level attributes.
Using the search filter
- Use the search box to look up properties by name.
.png?width=670&height=378&name=Untitled%20design%20(7).png)
- If you've searched for a property before, the search box will suggest the full property name, marked with a "recently searched" icon.
- To exit the search, either click outside the search box or use the ‘X’ icon to return to the full dashboard view.
Note: Active filters affect your search results. If a filter is applied (e.g., Done), only properties matching that filter will appear.
For example, if the Done filter is selected, you’ll only see approved properties in your search. Properties still in the Draft stage will not appear until the filter is cleared.
Applying other filters from the filter panel
In addition to the search bar, you can use the filter panel on the left side of the dashboard to refine your property list.
-
Scroll through the panel by hovering your mouse over it and using the scroll wheel.
If you're using a touchpad, use a two-finger swipe to scroll vertically.
-
Apply a filter by clicking the checkbox next to it. You can select multiple filters at once to further narrow down your results.
You can combine multiple filters simultaneously for more specific results.
.png?width=670&height=378&name=Untitled%20design%20(8).png)
To remove applied filters, choose any of the following options:
- Uncheck the selected filter checkboxes.
- Click the ‘X’ icon next to each filter tag to remove them individually.
- Click the ‘Clear All’ button to remove all filters at once.
The dashboard updates automatically as filters are applied or removed.
Supported filters and their definitions
You can filter properties using either checkboxes or field-based filters available in the left panel. Use the scroll feature to browse through all available filter options.
You can use either of the given filter options to search for property – fields or checkboxes. Use the scroll feature to browse the filter list.
.png?width=670&height=378&name=Untitled%20design%20(9).png)
Key Filter Types:
- Order ID: A unique identifier assigned to each property order.
- Status: Indicates the current stage of the property’s measurement process. You can filter properties based on the following statuses:
Status Definitions:
Understanding these filters helps you better organize and manage your property data across different workflows.
- Draft - When a property address is entered to create an order, the measurement process is considered initiated, and till the time it is submitted by the user for measurement at the platform, it falls in the category of a draft.
- In Progress - The stage that comes after the Draft is In Progress. Once the user has submitted a property for measurement, it takes some time to process the measurements and throw the output. The time duration between the order submission and the output data is referred to as In progress.
- Open Feedback - In the third stage, the measurement is presented to you for your review, feedback, and approval. If there is any discrepancy or queries, you can raise them before accepting the final results. It allows you to attach the files and pictures that can help us understand your concern better.
- Resolving Feedback - Feedback has been submitted and SiteRecon is working on addressing it. Once resolved, the property moves to Open Feedback or Done, depending on the outcome.
- Done This is the final stage of the measurement process, once you have approved the results it is finalized and made available for your use and export.
- Archived - You can clean the junk properties from your account without permanently deleting them by using the archive feature. Archived properties are not visible on the My Properties page. You can find archived properties by applying the archive status filter. You can also un-archive properties to bring them back to the main view.
- Self Measured - The users can either choose to get their properties measured using SiteRecon's imagery mapping tool or draw the property parcel manually. If the latter is the case, it is termed Self Measured.
- Instant Takeoff - Once the measurement has been generated by the ML (machine learning) model, it is previewed to the user. The property will be in Bolt Preview state till the user verifies the measurements.
Note: These order status terms have been streamlined to improve clarity and consistency within the dashboard based on user feedback.
Here’s how the statuses have been simplified:
| Previous Status | New Status |
|---|---|
| Draft | Draft |
| Measurement in progress | Take off in progress |
| Awaiting Approval | Open feedback |
| Resolving Feedback | Open feedback |
| Approved | Done |
| Self Measured | Self Estimated |
| Archived | Archived |
| Bolt Preview | Instant Takeoff |
| Bolt in Verification | Instant Takeoff |
| Bolt Approved | Instant Takeoff |
| Bolt Failed | Instant Takeoff |
Tag: Once a property is created with a tag included, it will be visible as a list under the Tag filter. Select them to further refine your search.
Customer Name refers to the customer, point of contact, or the owner of the property.
Created Date shows the date when you initiated the drafting of a property.
Customer ID is the unique identification information that can be assigned to each property. SiteRecon provides you with the freedom of making it numeric, alphabetical, or a combination of both as per your organizational data format needs.
Property Area is the area of the property being measured in acres.
City signifies the city of the property created.
State signifies the state of the property created.